Using the UART
Quick Start
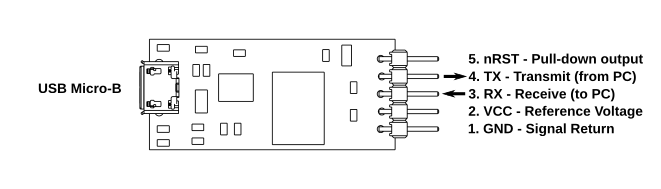
- Connect your project’s logic-level serial pins to the UART’s header pins using jumper wire, ribbon cable, socket, or other means.
- You must at minimum connect the GND and VCC pins. Connect GND to your circuit’s ground, and connect VCC to the supply rail that matches the logic level you wish to use. For example, if your project’s microcontroller runs at 5V then connect the UART’s VCC pin to the 5V supply. Supply voltages of 2.5 - 5.5V are supported.
- Connect the TX and/or RX pins to their counterpart on your project. Depending on how the target circuit is labeled, you may need to either wire TX to RX and vice versa, or you might need to wire TX to TX and RX to RX. The labels on the UART are from the perspective of the PC – TX is an output, and RX is an input.
- Finally, connect the UART to your PC using a USB cable with a Micro-B USB cable.
- You may need to install the FTDI Virtual COM Port drivers before you can use the UART. See Resources for download links. If you did install drivers, unplug and re-plug the USB cable afterwards to ensure it is detected. No additional drivers are required on Linux.
- The UART is now available as a regular COM port. See below for some tips on terminal emulator software for communicating with serial devices.
Using the nRST Output
The nRST is an “open drain” output that can be used to pull down a reset line. It can pull its output low or float but cannot drive it high, which means it will not interfere with other reset sources on the target board. This is ideal for use with a bootloader. For example, if your microcontroller has a serial bootloader that runs on power-up, you can use the reset output to programmatically trigger a reset then load new software into the target.
The reset function is implemented with a N-channel MOSFET connected to the FTDI’s “CBUS0” pin. Setting CBUS0 to logic high will pull nRST low, and setting CBUS0 to logic low will let nRST float. The CBUS0 function is not accessible through the Virtual COM Port interface. In order to control it, you will need to use a FTDI-specific library or tool. For more information about how to access FTDI functions from your application, see FTDI’s code examples.
Reconfiguring
FTDI supplies a tool called FT_Prog that can be used to reprogram various aspects of the UART’s behavior from a Windows PC. For example, you can change how the LEDs react to activity or disable them, invert the serial lines, or set a custom product description. See Resources for a download link.
Terminal Emulators
A typical use of the UART is to connect to a command-line terminal interface. To do this you will need terminal emulator software. On Windows, PuTTY is recommended. On Linux and BSD “screen” works well.
Windows - using PuTTY
Download PuTTY, either the standalone executable putty.exe (no install required), or the full installer putty-installer.exe. After starting PuTTY, a window titled “PuTTY Configuration” will appear. In the right-side pane, click “Serial”. In the text box under “Serial line”, type the name of the COM port. You can find a list of COM ports in the Windows Device Manager, where the UART will be named “USB Serial Port” with the COM port name following it in parentheses. In the “Speed” text box type the baud rate. Click “Open”. See below for instructions on how to use the command-line. When you are finished, close the window.
Linux/BSD - using screen
screen can be used to interact with a serial port with minimal fuss. To start a screen session with a serial port, or to open a new window from within an existing screen session, type:
screen /dev/ttyUSB0 115200
Where /dev/ttyUSB0 is the device that appears when you connected the UART, and 115200 is an example baud rate (actual baud rate will depend on your target device). Consult dmesg or /var/log/messages or journalctl for logging that indicates which serial port was assigned. When you are finished, type Ctrl-a, then k (for “kill”), then y to confirm.